> For the complete documentation index, see [llms.txt](https://docs.platform9.com/llms.txt). Markdown versions of documentation pages are available by appending `.md` to page URLs; this page is available as [Markdown](https://docs.platform9.com/private-cloud-director/2025.4/virtualized-clusters/add-hosts-virtualized-cluster.md).
# Host
A **Host** is a physical machine that you supply to space.vars.product\_name as a hypervisor. Once authorized and configured, virtual machines can be deployed on top of the host.
Once you have your Cluster Blueprint configured, space.vars.product\_name has the information it needs to configure hosts that will be added to the cluster.
## Host Agent
The Platform9 host agent is the first component you will install on each host. The host agent enables you to add hosts and configure their roles in your virtualized cluster. Based on each hosts' assigned role(s), the agent will download and configure the required software and integrate it with the space.vars.product\_name management plane.
The host agent is also used for ongoing health monitoring of the host, including failure and error detection. It also helps Platform9 orchestrate an upgrade for the host when you choose to upgrade your space.vars.product\_name deployment to a newer version.
## Roles
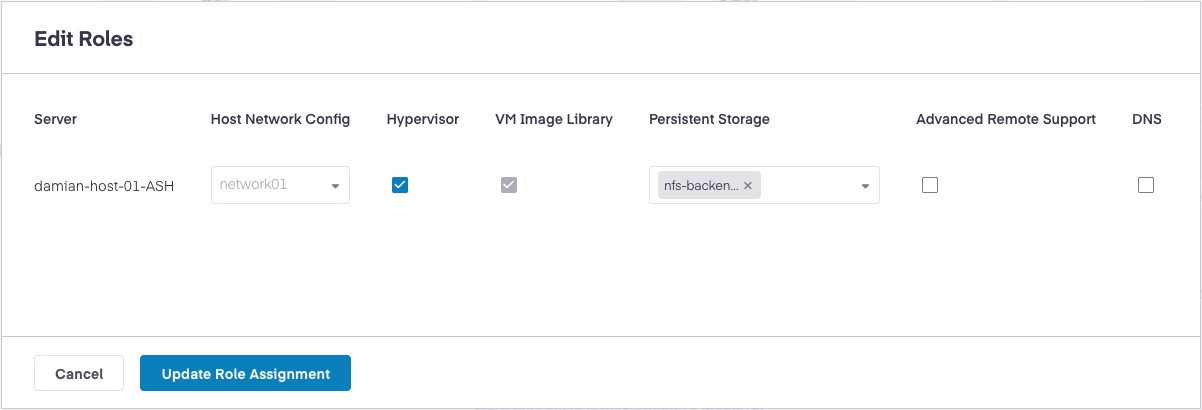
As part of host authorization process, you can configure hosts to perform specific functions by assigning them one or more roles. Following are the **supported roles**:
### Hypervisor Role
The Hypervisor role enables the Host to function as a KVM based Hypervisor in your Virtualized Cluster.
Typically, all hosts in your cluster will be assigned this role; unless you are experiencing performance bottlenecks and want to avoid running VM workloads on select hosts that are assigned other roles such as image library role or storage role.
### VM Image Library Role
Every cluster needs to have at least one 'Image Library', which will host the cluster copy of Virtual Machine source images from which new VMs can be provisioned. Read more about [Configuring Image Library Role here](/private-cloud-director/2025.4/virtualized-clusters/image-library---images.md#configuration-).
### Block Storage Node Role
One or more hosts in your cluster will typically be configured as a 'Block Storage Node'. Read more about how to [Configure Block Storage Role here](/private-cloud-director/2025.4/storage/block-storage-options---configuration.md#configure-block-storage).
### Enable Advanced Remote Support
For certain troubleshooting situations, Platform9 support teams may request access to automatically gather detailed telemetry from a host that is experiencing some problems. Enabling Advanced Remote Support enables this mode. By default, this should be disabled and should only be enabled when requested by Platform9 support.
## Add a Host (SaaS Deployment)
Ensure that the host that you are trying to add [meets the pre-requisites](/private-cloud-director/2025.4/getting-started/pre-requisites.md#host-hardware-and-configuration).
Once you have the required pre-requisites confirmed, add hosts by navigating to Infrastructure > Cluster Hosts, and click "Add New Hosts". Follow the instructions as shown. You will enter the administrative user's password when prompted.
You will now see the two simple steps in the UI that you need to run on each of your hosts. Remember to ensure you have `sudo` privileges.
{% tabs %}
{% tab title="Bash" %}
```bash
bash <(curl -s https://pcdctl.s3.us-west-2.amazonaws.com/pcdctl-setup)
pcdctl prep-node
```
{% endtab %}
{% endtabs %}
These commands download `pcdctl` CLI and invoke the `prep-node` command on `pcdctl`. The command will ask you for a number of inputs; the values for all of these specific to your environment are provided in your space.vars.product\_name UI for ease of use.
It will typically take 2-3 minutes to download and install the Platform9 host agent and other necessary Platform9 software components, which will then allow you to proceed to the next step to assign role.
## Add a Host (Self-Hosted & Community Edition Deployment)
Community Edition Note: Hypervisor hosts deployed as virtual machines must have virtualization support available inside the VM. Virtual machines on ARM CPUs are currently untested.
If you want to verify that nested virtualization is working in a VM, you can check for virtualization support inside the VM by running:
{% tabs %}
{% tab title="Bash" %}
```bash
egrep "svm|vmx" /proc/cpuinfo
```
{% endtab %}
{% endtabs %}
To add (onboard) a hypervisor host to a self-hosted or Community Edition deployment of space.vars.product\_name, login to the host and follow the following steps as a **root** user.
### Add DNS entries
{% hint style="info" %}
**Note**
An FQDN is a fully-qualified domain name for your space.vars.product\_name installation. For Community Edition, the FQDN for the workload region (and where you'll login to the user interface) is `pcd-community.pf9.io`. The FQDN for the infrastructure region is `pcd.pf9.io`.
{% endhint %}
As a root user, add DNS entries on each hypervisor host for both the infrastructure & workload region FQDNs using the `/etc/hosts` file.
{% tabs %}
{% tab title="Bash" %}
```bash
echo "" | tee -a /etc/hosts
echo "" | tee -a /etc/hosts
```
{% endtab %}
{% endtabs %}
{% tabs %}
{% tab title="Example" %}
```bash
echo "10.9.11.246 pcd.pf9.io" | tee -a /etc/hosts
echo "10.9.11.246 pcd-community.pf9.io" | tee -a /etc/hosts
```
{% endtab %}
{% endtabs %}
### Trust Management Plane SSL Certificate
As a root user, the self-signed management plane/workload region SSL certificate must be trusted on each target hypervisor host before beginning the host onboarding process.
{% tabs %}
{% tab title="Bash" %}
```bash
# Export DU_URL
export FQDN=
# Get the DUs self-signed certificate
openssl s_client -showcerts -connect $FQDN:443 2>/dev/null du.crt
# Copy it to trusted store
cp du.crt /usr/local/share/ca-certificates
# Refresh CA certs
update-ca-certificates
# Ensure curl does not complain about the certificate
curl https://$FQDN/keystone/v3
```
{% endtab %}
{% endtabs %}
An example output is shown below:
{% tabs %}
{% tab title="Example" %}
```bash
export FQDN=pcd-community.pf9.io
openssl s_client -showcerts -connect $FQDN:443 2>/dev/null du.crt
cp du.crt /usr/local/share/ca-certificates
update-ca-certificates
Updating certificates in /etc/ssl/certs...
rehash: warning: skipping ca-certificates.crt,it does not contain exactly one certificate or CRL
1 added, 0 removed; done.
Running hooks in /etc/ca-certificates/update.d...
done.
curl https://$FQDN/keystone/v3
{"version": {"id": "v3.14", "status": "stable", "updated": "2020-04-07T00:00:00Z", "links": [{"rel": "self", "href": "https://pcd-community.pf9.io/keystone/v3/"}], "media-types": [{"base": "application/json", "type": "application/vnd.openstack.identity-v3+json"}]}}
```
{% endtab %}
{% endtabs %}
### Prepare Host
{% hint style="info" %}
**Info**
Before preparing a hypervisor host, ensure that a cluster blueprint has been saved in the space.vars.product\_name user interface first.
{% endhint %}
In the space.vars.product\_name user interface, navigate to Infrastructure > Cluster Hosts, and click "Add New Hosts". Follow the instructions as shown. You will enter the administrative user's password when prompted.
## Authorize Host And Assign Roles
Now that your host is added, it will show up Infrastructure > Cluster Hosts with an "unauthorized" status, which means it is awaiting authorization and cluster role assignment. Select the host and click "Edit Roles". Configure the appropriate roles for this host based on your cluster architecture.
You can find more information about the respective roles in the documentation specific to that component. For eg read more about persistent storage role in this section of the block storage documentation - [Assigning Hypervisors Block Storage Role](/private-cloud-director/2025.4/storage/block-storage-options---configuration.md#assigning-hypervisors-block-storage-role).
Based on your desired cluster role assignment, the space.vars.product\_name management plane will work with the Platform9 agent installed on your host to configure the required software on your host. This will typically take 3-5 minutes to complete. During this time, you will see the host status as `converging` in the space.vars.product\_name UI.
### Monitor Host Addition Status
While a host is in converging state, you can monitor the status of this activity by looking at the hostagent log. See [Log Files](#log-files) for location of the hostagent log files. Tail the log file to monitor the status of host addition:
{% tabs %}
{% tab title="Bash" %}
```bash
tail hostagent.log
```
{% endtab %}
{% endtabs %}
{% hint style="success" %}
**Success**
Once the host is authorized and the role assignments have taken effect, your host is ready to use!
{% endhint %}
## Remove a Host
Fully removing a host from your space.vars.product\_name setup is a two step process. You must remove all roles assigned to the host first, and then, if required, decommission the host to cleanup any space.vars.product\_name related data from that host. You must perform both steps if you plan to re-add the host to your current or another space.vars.product\_name setup.
### Remove All Roles And Deauthorize a Host
Removing all roles from a host is a first step towards fully removing a host from your space.vars.product\_name setup. Removing all roles will uninstall any specific packages and software components specific to all roles assigned to the host.
Follow these pre-requisites before removing a host from your space.vars.product\_name setup.
1. If the host is assigned `hypervisor` role, make sure that there are no VMs running on the host.
2. If the host is assigned `persistent storage` role, make sure that there are no storage volumes being served by this host.
3. If the host is assigned `image library` role, make sure that there are no images in the image library being served by the host.
#### Remove all roles using UI
To remove all roles assigned to the host using the space.vars.product\_name UI, navigate to the Cluster Hosts menu in the UI, and click on the specific host. Then from the actions bar dropdown, click on the "Remove all roles" action.
If you haven't followed the pre-requisite steps mentioned above, the UI will warn you about any remaining objects that need to be cleaned up before the role removal operation can succeed.
#### Remove all roles using CLI
Use the following pcdctl command to remove all roles from a host.
{% tabs %}
{% tab title="Bash" %}
```bash
pcdctl deauthorize-node
```
{% endtab %}
{% endtabs %}
{% hint style="warning" %}
**Important**
Removing all roles only uninstalls and removes software packages associated with all roles from the host. It does not however clean up and delete any directories or files created as part of the installation of these software components. You must decommission a host in order for all space.vars.product\_name related data from that host to be removed.
{% endhint %}
### Decommission a Host
When you remove all roles from a host using the command above, any space.vars.product\_name specific packages and software components specific to those roles get uninstalled and removed from the host. However, any directories where the packages were installed are not cleaned up or deleted. This is to make sure that you still have access to the log files for those components if required for debugging.
To remove these directories and clean up any space.vars.product\_name related data from the host, you need to run decommission host command.
{% hint style="danger" %}
**Important**
1. Before you can decommission a host, you must remove all roles from the host using the space.vars.product\_name UI or CLI.
2. Always back up important data such as log files and configuration files from the host before decommissioning.
3. You must run decommission a host before you can add it again to your current or any other space.vars.product\_name setup. Not doing so will result in problems when re-authorizing the host in the space.vars.product\_name setup.
{% endhint %}
Decommissioning a host can only be performed using `pcdctl` CLI today.
Use the `pcdctl` to decommission a host by running the following command:
{% tabs %}
{% tab title="Bash" %}
```bash
$ pcdctl decommission-node
Do you wish to decommission the node? (y/n) y
Checking if any roles exist on the host
Cleaning up the node
Decommission Successful
```
{% endtab %}
{% endtabs %}
Once the command executes successfully, the host will be removed from the list of active hosts in the space.vars.product\_name UI. If you encounter errors during decommissioning, check the logs for details and ensure the host is reachable.
## Host States
Following are the different status values for a host:
* **ok** - The host is online and healthy and space.vars.product\_name is able to connect to it
* **converging** - A new role is being applied to the host and or the host is being authorized and added to a cluster
* **offline** - space.vars.product\_name management plane is unable to connect with the host, the host appears to be offline. Check auto$ for steps to debug this.
* **failed / error -** The host appears to be in a failed or error state. Check auto$ for more info.
## Host Aggregates
A host aggregate is a **group of hosts** within your virtualized cluster that share common characteristics. Read [Host Aggregate](/private-cloud-director/2025.4/virtualized-clusters/host-aggregate.md) for more information and how to configure them.
## Debugging Compute Service Problems
If your space.vars.product\_name Service Health dashboard is showing that the Compute Service is unhealthy, this may be because a large percentage of your hosts with Hypervisor role assigned are either offline or the compute service is unresponsive on those hosts. Refer to the [Log Files](#log-files) to debug the issue further.
## Log Files
Important log files for debugging:
1. **Log files for all services** - Each host stores all its log files for the various components running on it at `/var/log/pf9`**.** Here you will find logs for compute, image library, storage, networking and other services, depending on the roles assigned to that host. See the documentation for each individual service for more information about it's log files.
2. **Compute service log** - The log file for the compute service is located at `/var/log/pf9/ostackhost.log` on all hosts with hypervisor role assigned. Useful for debugging issues with virtual machine creation or updates.
3. **Host agent log** - The log file for the Platform9 host agent that is installed on each host is located at `/var/log/pf9/hostagent.log`. This is helpful for debugging issues with host agent install or connectivity with space.vars.product\_name management plane.
4. **Communication agent log** - Located at `/var/log/pf9/comms/comms.log`. Log file for Platform9 communications agent that is responsible for ensuring the health and uptime of host agent. Helpful for debugging issues regarding connectivity.
5. **Libvirt logs** - Located at `/var/log/libvirt/qemu/` where should be the UUID of the VM and at `/var/log/libvirt/libvirtd.log`. Libvirt logs help with debugging any resource allocation or other issues with virtual machine instances.
---
# Agent Instructions
This documentation is published with GitBook. GitBook is the documentation platform designed so that both humans and AI agents can read, navigate, and reason over technical content effectively. Learn more at gitbook.com.
## Querying This Documentation
If you need additional information that is not directly available in this page, you can query the documentation by asking a question.
Perform an HTTP GET request on the following URL with the `ask` and `goal` query parameters:
```
GET https://docs.platform9.com/private-cloud-director/2025.4/virtualized-clusters/add-hosts-virtualized-cluster.md?ask=&goal=
```
`ask` is the immediate question: it should be specific, self-contained, and written in natural language.
`goal` is what the user is ultimately trying to achieve, the reason they need the answer. Sharing it helps GitBook give you a better, more relevant answer. A goal is most helpful when it describes the outcome the user wants rather than restating the question. For example, with `ask=how do I create an API token`, a goal like `automate deployments from our CI pipeline` lets GitBook tailor the answer to that use case.
The response will contain a direct answer to the question and relevant excerpts and sources from the documentation.
Use this mechanism when the answer is not explicitly present in the current page, you need clarification or additional context, or you want to retrieve related documentation sections.