# Upgrading Ubuntu 16.04 to Ubuntu 18.04
This article walks through the process of upgrading an Ubuntu 16.04 (Xenial) host running OpenStack workloads to 18.04 (Bionic).
{% hint style="warning" %}
**Note**
Ubuntu 16.04 is now deprecated and will not be supported with the next (5.3) release of Platform9 Managed OpenStack.
{% endhint %}
## Steps
### Prepare the host for the upgrade
Ensure that you are running Platform9 version 4.2.0 or later. Please [reach out to Platform9 support](https://support.platform9.com/hc/en-us/requests/new?ticket_form_id=360000931054) to upgrade.
If you have workloads running on this host, you will need to either gracefully shut down the workloads or live-migrate them to another host before you proceed. Please refer to these guides to live-migrate [volumes](https://support.platform9.com/hc/en-us/articles/360010715314-Migrating-Cinder-Volumes-in-a-LVM-Storage-Backend) and [instances](https://github.com/platform9/pcd-docs-gitbook/blob/main/other-docs/pmo/5.8/preparing-ubuntu/virtual-machines-live-migrate.md).
### Package/Kernel Upgrades
1. Upgrade packages on 16.04 to their latest version.
{% tabs %}
{% tab title="Bash" %}
```bash
sudo apt update
sudo apt upgrade
```
{% endtab %}
{% endtabs %}
2. Reboot the host if there were kernel upgrades.
{% tabs %}
{% tab title="Bash" %}
```bash
sudo reboot
```
{% endtab %}
{% endtabs %}
### Disk Cleanup
{% hint style="info" %}
**IMPORTANT**
Remember to have at least **20GB** of free disk space under your root partition `/` before you begin the upgrade. A good place to cleanup is `/boot` which stores all previously installed kernels; the older kernels are safe to delete.
{% endhint %}
1. Identify the current kernel version used.
{% tabs %}
{% tab title="Bash" %}
```bash
uname -a
```
{% endtab %}
{% endtabs %}
2. Fetch the list of available kernels.
{% tabs %}
{% tab title="Bash" %}
```bash
dpkg --list | grep linux-image
```
{% endtab %}
{% endtabs %}
3. Cleanup all kernels with versions lower than your current kernel version.
{% tabs %}
{% tab title="Bash" %}
```bash
sudo apt-get purge linux-image-x.x.x.x-generic
```
{% endtab %}
{% endtabs %}
{% hint style="info" %}
**Info**
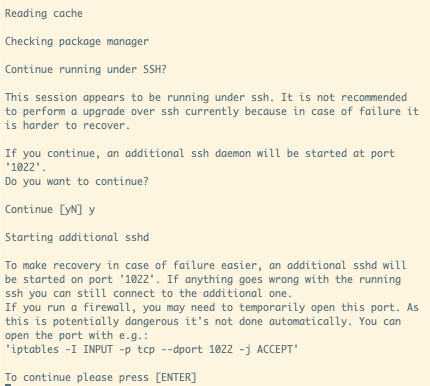
We use `do-release-upgrade` to upgrade to the next LTS release. For recoverability in case of failure, `do-release-upgrade` opens another SSH session on port `1022`. If you have a firewall blocking access to that port, you would need to open that up now.
{% endhint %}
For example, if you are using `ufw`:
{% tabs %}
{% tab title="Bash" %}
```bash
sudo ufw allow 1022/tcp
```
{% endtab %}
{% endtabs %}
Alternatively, if you use `iptables`:
{% tabs %}
{% tab title="Bash" %}
```bash
iptables -I INPUT -p tcp --dport 1022 -j ACCEPT
```
{% endtab %}
{% endtabs %}
### Upgrading to Ubuntu 18.04
1. Once the packages installed have all been upgraded to their latest versions, kickoff the Ubuntu upgrade to the next LTS version - which, in this case, is 18.04.
{% tabs %}
{% tab title="Bash" %}
```bash
sudo do-release-upgrade
```
{% endtab %}
{% endtabs %}
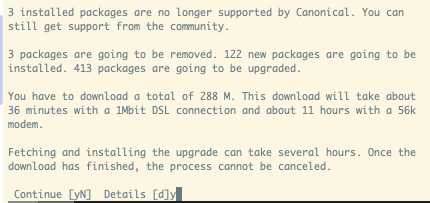
2. This fetches the updated package list for bionic and prompts you to continue to begin downloading packages.
3. As the installation proceeds, you will be periodically prompted to choose if you want an updated config file for various services. Remember to pick `keep the local version currently installed.`
4. Once the installation completes, reboot the host.