# Customize VM Instance with Cloud-init
This Platform9 OpenStack tutorial describes tips on using various options to customize a virtual machine using cloud-init.
### Customize Virtual Machine Hostname
Virtual machines deployed using cloud-init enabled images will by default be configured with hostname created using the name given to the virtual machine, and a randomization suffix.
### Set Default Password and Inject Custom Script Using User Data
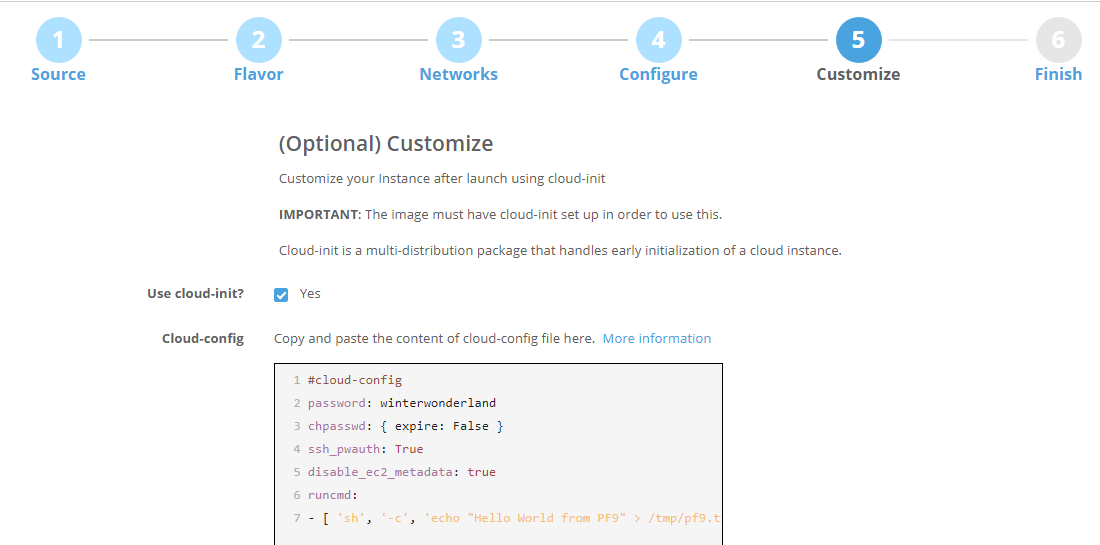
Create a text file with following information.
{% tabs %}
{% tab title="None" %}
```none
#cloud-config
password: winterwonderland
chpasswd: { expire: False }
ssh_pwauth: True
runcmd:
- [ 'sh', '-c', 'echo "Hello World from PF9" > /tmp/pf9.txt']
```
{% endtab %}
{% endtabs %}
Paste the configuration above to the cloud-init config text area:
where:
{% hint style="warning" %}
**IMPORTANT**
The first line is NOT a comment and should not be skipped or modified. It is a directive indicating that the content that follows should be merged with cloud.cfg that the virtual machine instance already has.
{% endhint %}
{% hint style="warning" %}
**Attention**
This is a YAML file. Be careful with the YAML syntax around spacing. Failing to include appropriate spacing where required will result in silent failures (For example, inability to logon to the instance).
{% endhint %}
{% hint style="success" %}
**Tip**
Verify the YAML syntax by writing small sample python code such as this:
{% endhint %}
{% tabs %}
{% tab title="Python" %}
```python
import yaml
file = open("/tmp/pf9-user-data.txt")
obj = yaml.load(file)
print obj
```
{% endtab %}
{% endtabs %}
The output should be a Python dict string representation of the above YAML file.
{% tabs %}
{% tab title="Output" %}
```python
{'password': 'winterwonderland', 'chpasswd': {'expire': False}, 'ssh_pwauth': True, 'runcmd': [['sh', '-c', 'echo "Hello World from PF9" > /tmp/pf9.txt']]}
```
{% endtab %}
{% endtabs %}
* 'winterwonderland' is the desired default password you wish to set for this virtual machine
* 'runcmd' is a list of commands you would like to inject into this virtual machine. Each element can be a string or another list (like execev). Following article offers comprehensive details: [Cloud-Init: Run commands on first boot](http://cloudinit.readthedocs.org/en/latest/topics/examples.html#run-commands-on-first-boot).
Finally, invoke Nova command via CLI or REST API to create a new instance, passing the extra parameters for customization.
{% tabs %}
{% tab title="CLI" %}
```python
# format
# nova boot --config-drive=true --image --flavor --nic net-id= --user-data
# example
nova boot --config-drive=true --image ubuntu-16.04-cloudimg.img --flavor 2 --nic net-id=c3454717-f813-4419-9203-ceb78b0aa3f9 --user-data /tmp/pf9-user-data.txt pf9-ubuntu-test-1
```
{% endtab %}
{% endtabs %}
### Inject SSH Key-Pair into Virtual Machine
* First, generate a new ssh key pair to be used for the new virtual machine:
{% tabs %}
{% tab title="Bash" %}
```bash
ssh-keygen -t rsa -C
```
{% endtab %}
{% endtabs %}
* Now add the key pair to Nova:
{% tabs %}
{% tab title="Nova" %}
```bash
# format
# nova keypair-add -p
# example
nova keypair-add -p ~/.ssh/id_rsa.pub rparikh-ssh
```
{% endtab %}
{% endtabs %}
* List key pairs registered with Nova:
{% tabs %}
{% tab title="Nova" %}
```bash
nova keypair-list
```
{% endtab %}
{% endtabs %}
* Now with nova boot command you can optionally pass the key-name as the argument:
{% tabs %}
{% tab title="Nova" %}
```bash
nova boot --config-drive=true --image ubuntu-16.04-server-cloudimg-amd64-disk1.img --flavor 2 --nic net-id=c3454717-f813-4419-9203-ceb78b0aa3f9 --key-name pf9-ssh --user-data /tmp/pf9-user-data.txt pf9-ubuntu-test-2
```
{% endtab %}
{% endtabs %}
* That's it. Once the virtual machine instance is active, you can ssh into the instance using the private key.
### Example cloud-config File with Comments
{% hint style="info" %}
**Note**
Some features only work with cloudinit >= v0.7.5 (Ubuntu 14 or newer, and CentOS 7.x)
{% endhint %}
{% tabs %}
{% tab title="YAML" %}
```yaml
#cloud-config
# 1. Create a new group
groups:
- pf9testgroup
# 2. Change default user add to new group and add sudo access
system_info:
default_user:
name: default-user
lock_passwd: true
groups: pf9testgroup
sudo: ["ALL=(ALL) NOPASSWD:ALL"]
# 3. Change password of default user
password: groovy
chpasswd: { expire: False }
ssh_pwauth: True
# 4. Create new user and also create the default user
# 5. Add ssh-key
# 6. Add password ("groovy")
# 7. Add to group
# 8. Add sudo access
users:
- default
- name: new-user
ssh-authorized-keys:
- ssh-rsa AAAAB3NzaC1yc2EAAAABIwAAAGEArdM+gvsEq8BBvtTRHPa23mRsGSWDlWi9gvRSjhvcgYhsnssEy/QvSokqQgfJ7O8uEf3JEvDhGbX/G65YzLeyO4hS+R86vGAyyJuLXPuAyrWwccWdeOJeno26P5CutRVp test_key@platform9
lock_passwd: false
groups: pf9testgroup
passwd: $6$whatwhat1$mkCxCGXIEgF.6CjvGsdcoseQNFy/IvKS3dxz64uHxH7Y75KvJVMc96oEjhgd2ixrMpTwNjiWVG967009HqAyT1
sudo: ["ALL=(ALL) NOPASSWD:ALL"]
# 9. File creation
write_files:
- content: |
# This will go inside the file
OK Platform9, this is working.
path: /tmp/pf9_write_file.txt
permissions: '0777'
# 10. Run arbitrary commands
runcmd:
- [ 'sh', '-c', 'echo "Hello World from PF9" > /tmp/pf9_hello.txt']
- [ 'sh', '-c', 'date > /tmp/pf9_date.txt']
# 11. Set hostname
hostname: pf9-hostname
# 12. Set timezone
timezone: US/Eastern
# 13. Install packages
packages:
- git
- gdb
# 14. Restart network service for Redhat guests (this will fail gracefully on Debian guests)
bootcmd:
- [ 'sh', '-c', 'service network restart' ]
```
{% endtab %}
{% endtabs %}