# Installing OpenStack CLI on Windows
Before you can install OpenStack CLI on Windows, you must install Python 2.7 and Microsoft Visual C++ compiler for Python, on the Windows host.
Download the [Python 2.7 installer](https://www.python.org/downloads/windows/) and the [Microsoft Visual C++ Compiler for Python 2.7.](https://www.microsoft.com/en-us/download/details.aspx?id=44266)
## Install Python and Microsoft Visual C++ Compiler
Follow the steps given below to install Python.
**Note:** You are not required to install pip separately as pip is automatically installed with Python 2.7.
1. Download and install Microsoft Visual C++ Compiler for Python 2.7
2. Run the Python installer that you have downloaded from the Python website.
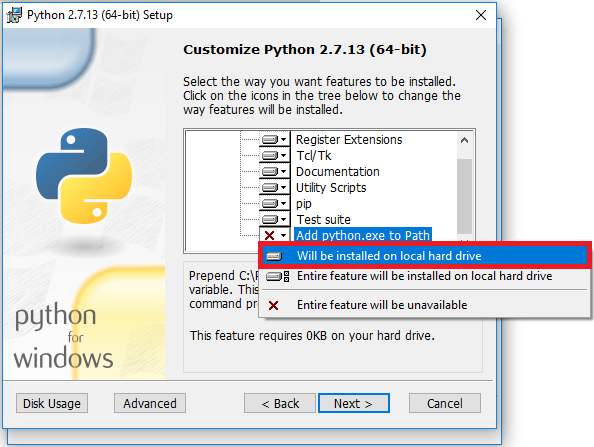
3. During the installation, include the Python directory path in the PATH environment variable. Select the *Will be installed on local hard drive* option for the *Add python.exe to Path* feature, and then click Next.
The Python installation path is automatically added to the PATH environment variable on successful installation of Python, when this option is selected.
## Install OpenStack CLI
To install OpenStack CLI, follow the steps given below.
1\. Run the following command in the Windows Shell.
{% tabs %}
{% tab title="Shell" %}
```bash
pip install --upgrade --requirement https://raw.githubusercontent.com/platform9/support-locker/master/openstack-clients/requirements.txt --constraint https://raw.githubusercontent.com/openstack/requirements/stable/pike/upper-constraints.txt
```
{% endtab %}
{% endtabs %}
2\. Download the OpenStack RC file from the Platform9 Clarity UI.
3\. Download the Windows PowerShell script from
4\. Start Windows PowerShell, and change into the directory where you saved the above script.
{% tabs %}
{% tab title="Shell" %}
```bash
cd .\
```
{% endtab %}
{% endtabs %}
5\. Run the downloaded Windows PowerShell script with the OpenStack RC file as argument.
{% tabs %}
{% tab title="Shell" %}
```bash
.\Source_OpenRC.ps1 .\openstack.rc
```
{% endtab %}
{% endtabs %}
You are now ready to run OpenStack CLI commands on the Windows host.
{% hint style="info" %}
**Info**
**Note:** If you receive the error “Source\_OpenRC.ps1 cannot be loaded. The file Source\_OpenRC.ps1 is not digitally signed,” you could consider modifying the ExecutionPolicy for the current user, or process to permit execution of the script.
{% endhint %}
{% tabs %}
{% tab title="Shell" %}
```bash
Set-ExecutionPolicy -Scope -ExecutionPolicy Bypass
```
{% endtab %}
{% endtabs %}
*See Microsoft's PowerShell* [*Set-ExecutionPolicy*](https://docs.microsoft.com/en-us/powershell/module/Microsoft.PowerShell.Security/Set-ExecutionPolicy) *documentation for more information.*